Originally designed as a basic MP3 player based on SoundJam
in 2000, Apple iTunes
has grown to be a full-fledged media player and app center. It now acts as a
movie and music media player, digital media distribution center and repository
of all iOS apps.
Without doubt, iTunes is still a pretty decent media player,
even if at times it feels rather bloated when your music and movie collection
grows out of control. However, like anything else complex, it can be a little
tricky to figure out how to use iTunes most effectively on your Mac OS X
computer. Here are five simple yet helpful tips and tricks to help you get the
most out of your iTunes experience.
Find and Delete
Duplicate Songs From iTunes On Your Mac
One of the changes in iTunes 11, which debuted in November
of last year, was the loss of a “find
all duplicates” feature that was really handy for finding and deleting
duplicate files in our rather voluminous iTunes libraries. Luckily, Apple
re-included the feature in the latest version of iTunes 11, version 11.0.1.
Here’s where to find it, and how to use it to help yourself clean up that
iTunes library.
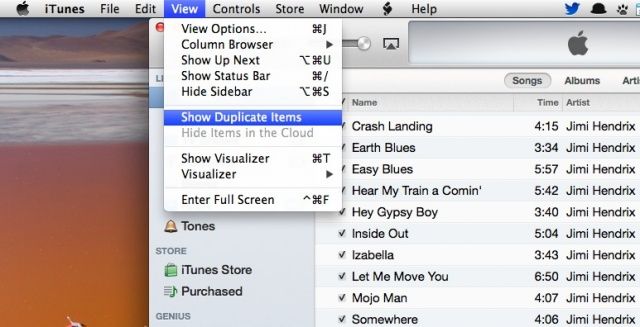
Once you have iTunes launched, head up to the View menu and choose
“Show Duplicate Items.” The iTunes
media window should then update, showing you all the files that are considered
duplicates. The list will include all versions of the files that seem to be the
same, so be careful you don’t just Select
All and Delete.
To decide which files to delete is very necessary. If
they’re exact duplicates, it won’t matter. The best way to figure out whether
they are is to use the Information window, which can be brought up with a
Command-click on each of the duplicated files, then hitting Command-I on your
keyboard. Click over to the Info tab and then use the arrows in the lower left
to flip through the info about each file. If you don’t notice any difference in
bit rate or encoding, or whatever might change from one file to the next, you
have perfect duplicates. Delete either one. If, however, you see that one file
is at a lower encoding rate, or is perhaps a lower-quality recording, get rid
of that one.
Actually, there’s better way to help you find and delete duplicate
songs from iTunes on your Mac OS X computer. That’s to make use of third-party
iTunes cleaner program, like the Tunes Cleaner for Mac, which
does exactly a great job for you to delete duplicate songs in iTunes on Mac.
Multiple
Artists–Building A Better Smart Playlist
Smart Playlists are fantastic, and they really do work to
help you listen to the kind of music you’re in the mood for, using a variety of
user-controlled criteria. You can create a Smart Playlist for any given Artist
in your iTunes library fairly easily.
But how to create a playlist that includes more than one
Artist? Take the iTunes 11.0.2 for example. First up, launch iTunes. Click on
the iTunes menu, and choose New,
then Smart Playlist. The dialog box that shows up will look familiar to anyone
who’s created a mail rule/filter before. Fill in the first artist you want to
include in your Smart Playlist (iTunes will try and autofill from the Artists
in your collection), and then click on the plus button to the right. A second
Artist field will show up. Fill in the second artist you want to add, and hit
the plus button for every new artist you want to include in your playlist. Then,
above, where it says “Match all of the following rules,” click on the word
“all” and change that to “any.” Feel free to limit the number of items or time,
and allow for Live updating if you want the Smart Playlist to include new music
you add after you’ve created it.
Click on the OK button in the lower right, and you’ll get to
name the playlist in the sidebar, which just calls it “playlist” by default.
Name it how you want, hit Return, and then you’ve got a playlist that includes
music from any of the artists in your ruleset.
Make A Visual
Playlist For Your Party With An Album Artwork Screensaver
One of the trickier things about creating a playlist for any
party is making sure you have the right music for the people you’ve invited.
Sometimes, though, you might want to give this entire nerve-wracking process a
miss, and let the guests at your house choose the music from all the songs and
artists you have in iTunes on your Mac.
Here’s how to do just that, using nothing more than your Mac
and the iTunes Album Artwork screensaver. Firstly, launch System Preferences
from the Dock or the Apple Menu. Click on the Desktop & Screensaver icon to
go to that preference pane. Scroll down the left-hand column until you see the
iTunes Artwork screensaver. Click on it, and then click on Screen Saver Options…
to set the number of rows and a delay. Click on OK.
If you’ve set your Hot Corners… to have one of them start
your screensaver, do that now. If not, wait the amount of time you have your
screensaver set to. Once the iTunes Artwork screensaver starts, you can now
move your mouse around without waking up your Mac. You can click on any of the
albums showing up on the screensaver to play that song. Bam–you have an easy,
guest-controlled jukebox for your party.
You’ll need to clear the Up Next playlist in iTunes for this
to work when using iTunes 11.
Customize What You
See In The Sidebar
If you’ve only recently upgraded to iTunes 11, you might be
wondering where some of the features you relied on are? If you’re looking for
Podcasts or Radio in the Sidebar, you might not see them right off. Luckily,
the fix is fairly easy, and it’s also a great way to customize what you do see
there, letting you get rid of things like iTunes U, Ringtones, and other stuff
that you may not even have an interest in.
First, launch iTunes 11 from your Applications folder or
Dock, and then head up to the iTunes menu. Choose Preferences with a click, or
just hit Command-Comma on your keyboard. Once there, click on the General tab
to the far left and you’ll see a section marked “Show:” just below the library
name. Click on any of the types of media you want to see, like Radio and the
Podcast media, and then click OK at the bottom of the window. If you don’t want
to show stuff, like iTunes U or Ringtones, simply click the checkboxes off, so
they’re no longer checked or blue.
You’ll now see the Podcast tab in the sidebar, and the Radio
tab above your media when viewing the Music tab. I’m not sure why the Radio
section will not show up in the sidebar, or why the Podcast button will not
show up across the top. You can also hit Command-4 to bring up your podcasts.
Seems as if Apple is still struggling to unify things with the latest version
of iTunes.
Password Protect Your
Shared Music and Movies
If you share your songs and movies via iTunes on your home
network, you might not want just any old people to access your shared media or
playlists, even if you let them onto your Wi-Fi. While iTunes lets you share
all the types of media it can serve up, maybe your kids or office mates don’t
need to listen to those hardcore rap tunes.
It’s fairly easy to protect your shared items with a
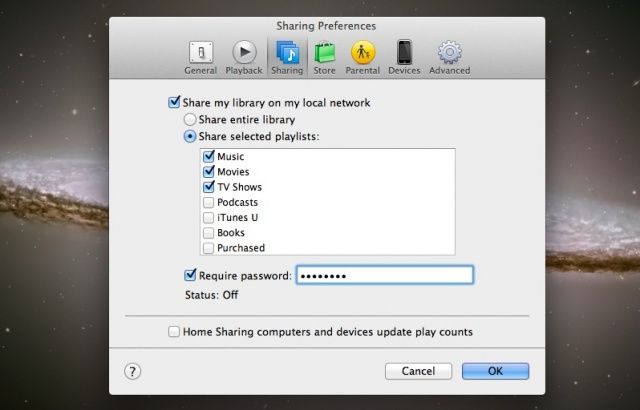
password, using the iTunes Preferences. Launch iTunes, and then open
Preferences from the iTunes menu, or hit Command-Comma on your keyboard. Click
on the Sharing tab at the top, and (as long as Sharing is enabled, of course)
click on either the “Share entire library” radio button, or the “Share selected
playlists” button. If you choose the latter, click on the checkboxes next to
the specific media or playlists you’d like to share. That way you can just
share music, or movies, or iTunes TV shows, if you like.
Once that’s taken care of, click on the “Require password”
checkbox, and type in a password that you’ll remember, and you’ll be able to
share with the folks you’d like to give access to. Or keep it to yourself for
private iTunes sharing, you selfish meanie. Don’t use your Mac’s admin password
or any other secure password that you don’t want to share. When finished, click
on OK.


No comments:
Post a Comment